


To facilitate a seamless passport booking process, the Nigerian Immigration Service, under the guidance of the Ministry of Interior, launched Nigeria’s first-ever online application portal for international passports on January 8, 2024.
The portal enables citizens at home and in the diaspora to book appointments, make payments, and get a date for biometric from their comfort zones.
Minister of Interior, Dr. Olubunmi Tunji-Ojo, said the initiative is an integral part of the process to accelerate the Nigerian passport collection process, ensure a proper verification process, and ensure a fully automated system of passport application in the country.
This article is a complete guide on how to apply for an international passport and book an appointment for biometric capturing.

Also Read: Ministry of Interior, Immigration Service launches digital portal for passport booking, renewal, visa others.
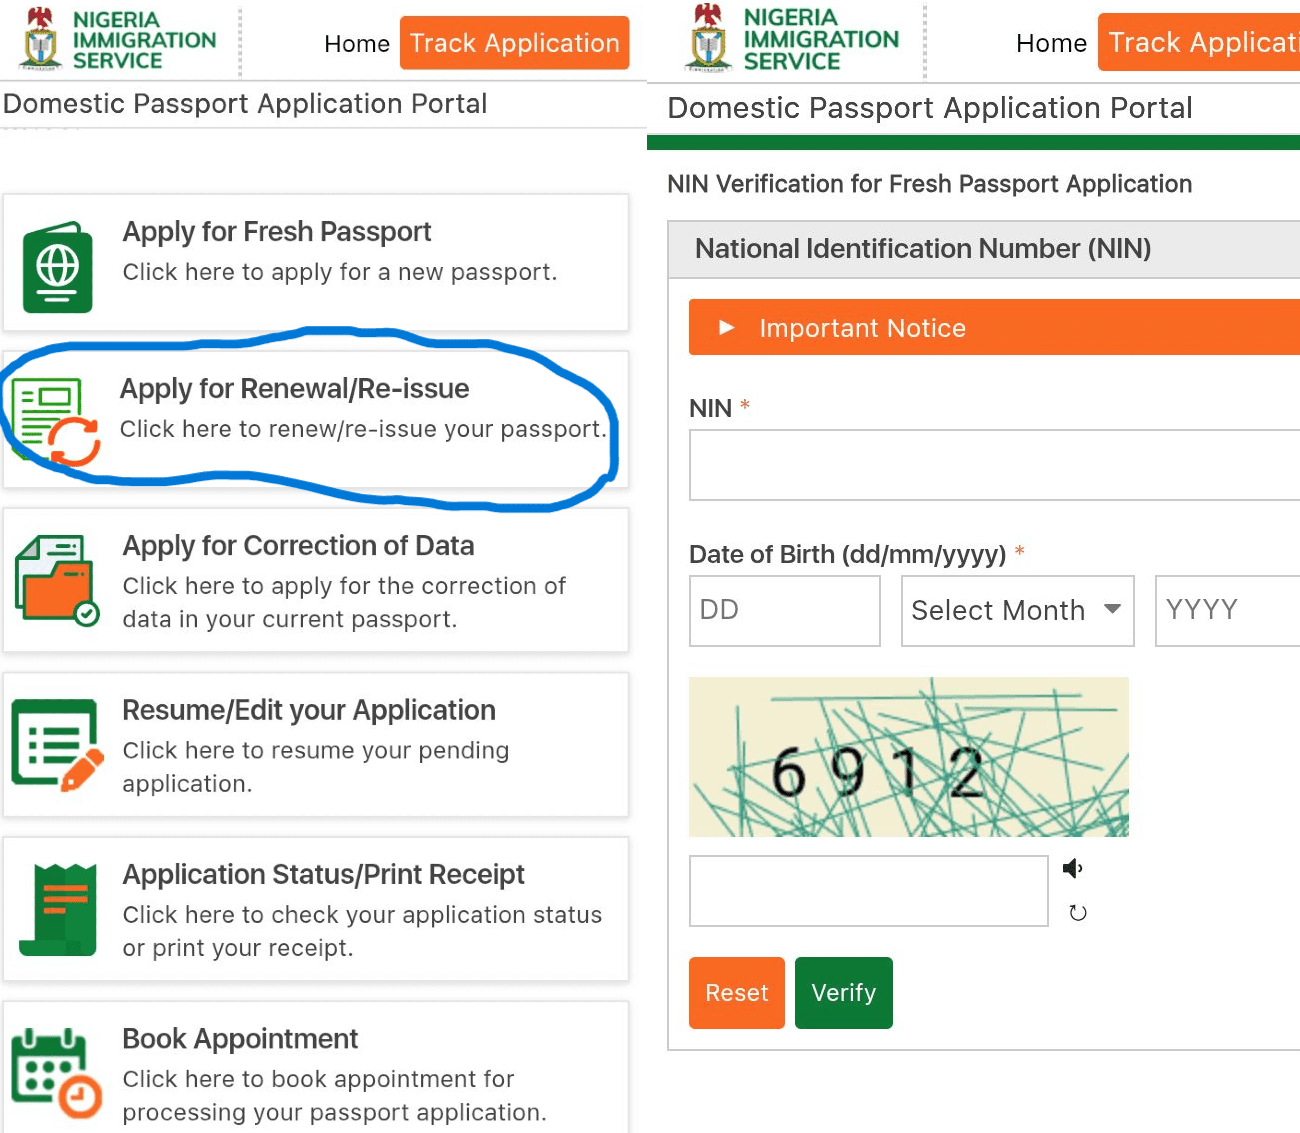
First Stage – Application
- Search for the passport application website on your browser and click on ‘Apply for Fresh Passport.’
- On the NIN verification page, provide details such as your NIN and date of birth, then click on ‘verify.
- It will automatically generate your biodata, including your full name, date of birth, gender, and marital status. Click on ‘Confirm’ after verification.
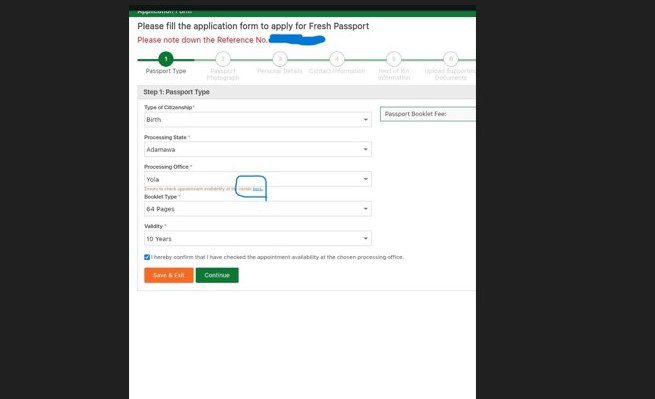
- You will then be directed to the Passport Type page. Ensure you take note of the ‘Reference No’ that appears at the top of the page, as this will be used to track your application if you’re unable to complete it in one sitting.
Step 1 – Passport Type
Here, you will be required to provide information such as your citizenship type, processing state, processing office within the state, the type of passport booklet, and validity. A 32-page booklet with a 5-year validity costs N50,000 while a 64-page booklet with a 10-year validity costs N100,000.
Before selecting your preferred processing office, check its availability by clicking on the directory below the ‘Processing Office’ box. Once confirmed, tick the confirm box.
You can either ‘Save & Exit’ or ‘Continue’. While the former helps save your progress permanently and directs you to the homepage, the latter takes you to the next step without saving your progress permanently.
To resume after saving, click on ‘Resume/Edit your Application’ on the homepage and input the necessary login details such as reference number and date of birth.
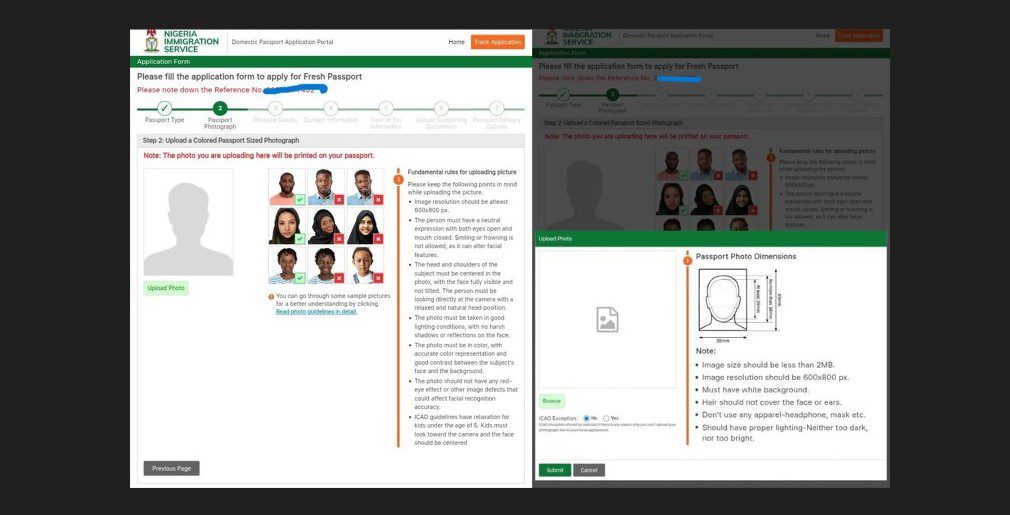
Step 2 – Passport Photograph
In this session, you are expected to upload a clear passport-size photograph. Ensure you go through the accepted samples and guidelines. The picture is expected to be less than 2MB in size, with a resolution of 600×800 or less, a sharp white background, and a neutral facial expression.
Click on ‘Upload,’ browse for the preferred passport photograph from your device, adjust it, and submit. In case of rejection, zoom in on the picture and adjust accordingly.
Tip: Use a very sharp camera and avoid filtering the image, as the ICAO detector will automatically flag off such images.
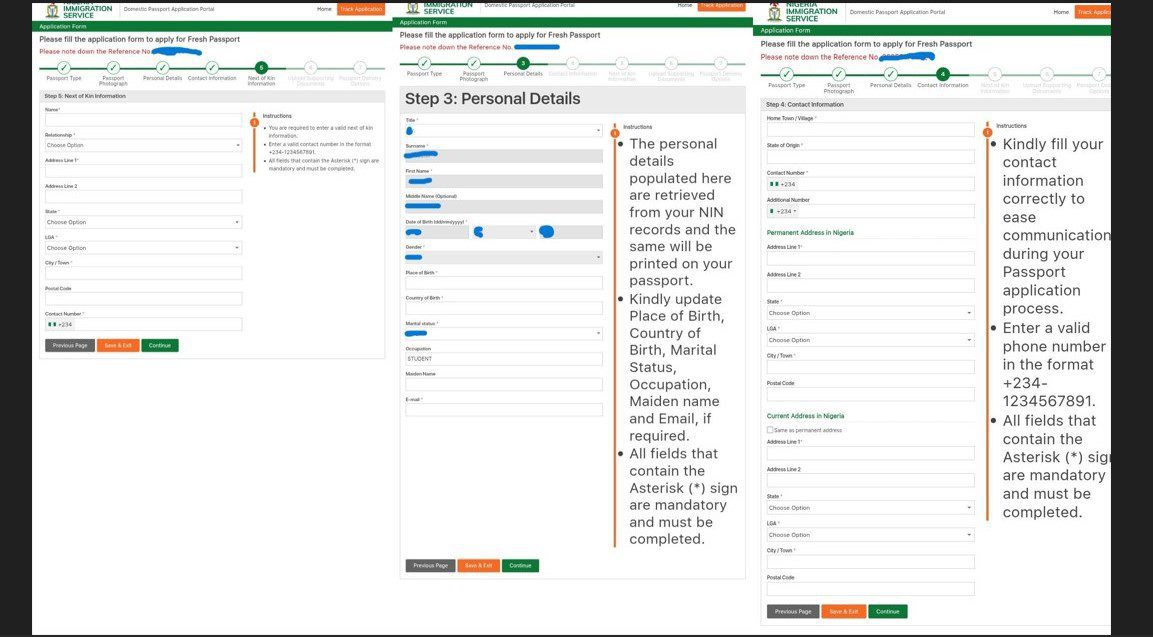
Step 3 – Personal Details
While biodata such as name, date of birth, and gender are automatically generated here, you will be required to fill in details such as title, place of birth, country of birth, marital status, occupation, maiden name, and an active email.
Once completed, click on ‘Save & Exit’ or ‘Continue’ to proceed to the next step. You can also click on ‘Previous Page’ for any changes.
An email will be sent to notify you that your application has been successfully initiated.
Step 4 – Contact Information
Personal data, such as state of origin, hometown, contact number, and both permanent and current addresses, is required here.
Step 5 – Next of Kin Information
You will be required to provide a valid next of kin biodata.
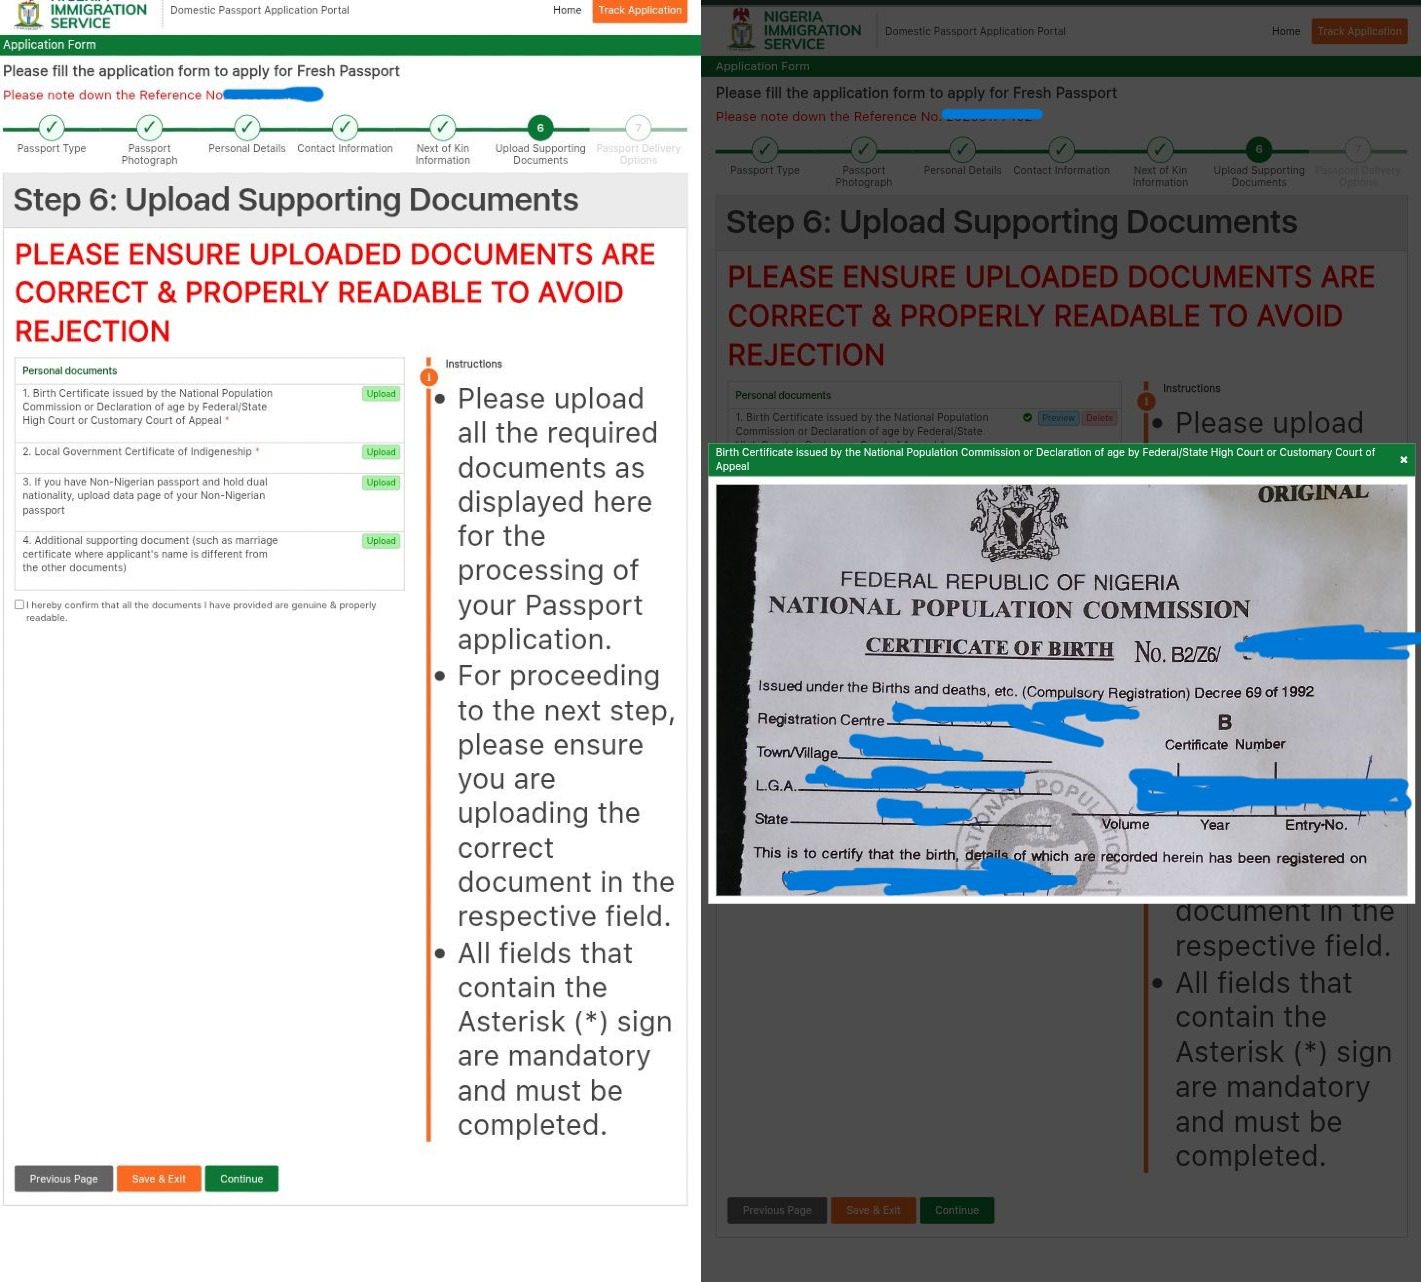
Step 6 – Upload Supporting Documents
Here, you are to upload documents that are correct, sharp, and properly readable. The documents are:
- A birth certificate issued by the National Population Commission or a Declaration of age by the Federal/State High Court or the Customary Court of Appeal.
- Local Government Certificate that proves your indigeneity.
While the above are mandatory for every applicant, others are required as they apply.
- Uploading of the data page of a Non-Nigerian passport for applicants with dual citizenship
- A supporting document, such as a marriage certificate, where an applicant’s name differs from that on other documents.
Step 7 – Passport Delivery Options
Here, you will be required to select either picking up your passport at the Immigration Processing Centre or using a courier service (with an additional fee charged). In a true sense, the courier service isn’t functioning.
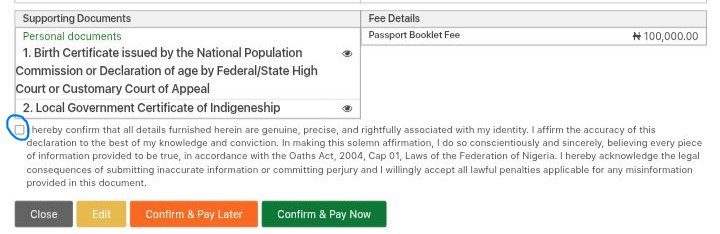
By clicking ‘Continue’, all your application details will be on display for final confirmation. You can click on ‘Edit’ in case there’s an error, or ‘Close’ if you are unsure of any action.
- Once you have confirmed the information is correct, tick the ‘I hereby confirm…’ box.
- Click on Confirm & Pay Later or Confirm & Pay Now.
- Importantly, take note of the Application number at the top of the page. Both the reference and application numbers are vital for tracking your application and booking a biometric appointment.
- An email of the application slip will be sent to the provided address.
- You will only be eligible for further processing (such as a biometric appointment) after making payment.
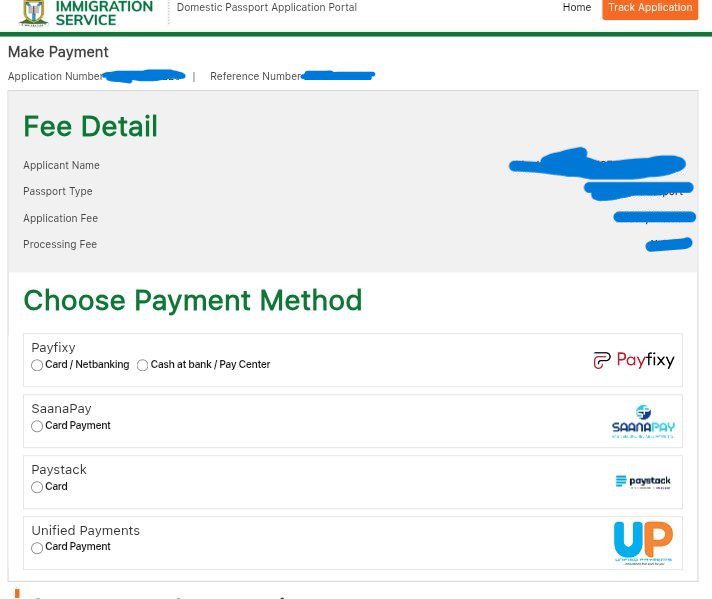
Step 8 – Payment
You will be expected to pay an application fee and a processing fee. While the former is fixed (N50,000 for a 32-page, or N100,000 for a 64-page), the latter fee depends on the gateway and payment method.
- Click a preferred gateway from the available payment methods (Payfixy, SaanaPay, Paystack, and Unified Payments).
- Click on Pay…..
- Follow other instructions for selecting your preferred mode of transaction.
- Once your transaction is successful, you will receive a confirmation email of your payment receipt. You will also receive a new application slip with your ‘Payment Status’ showing ‘Paid’ and the ‘Approval Status’ as ‘Waiting for Approval.’
Also Read: A complete guide on using Nigeria’s new contactless passport app.
Second Stage – Biometric Appointment
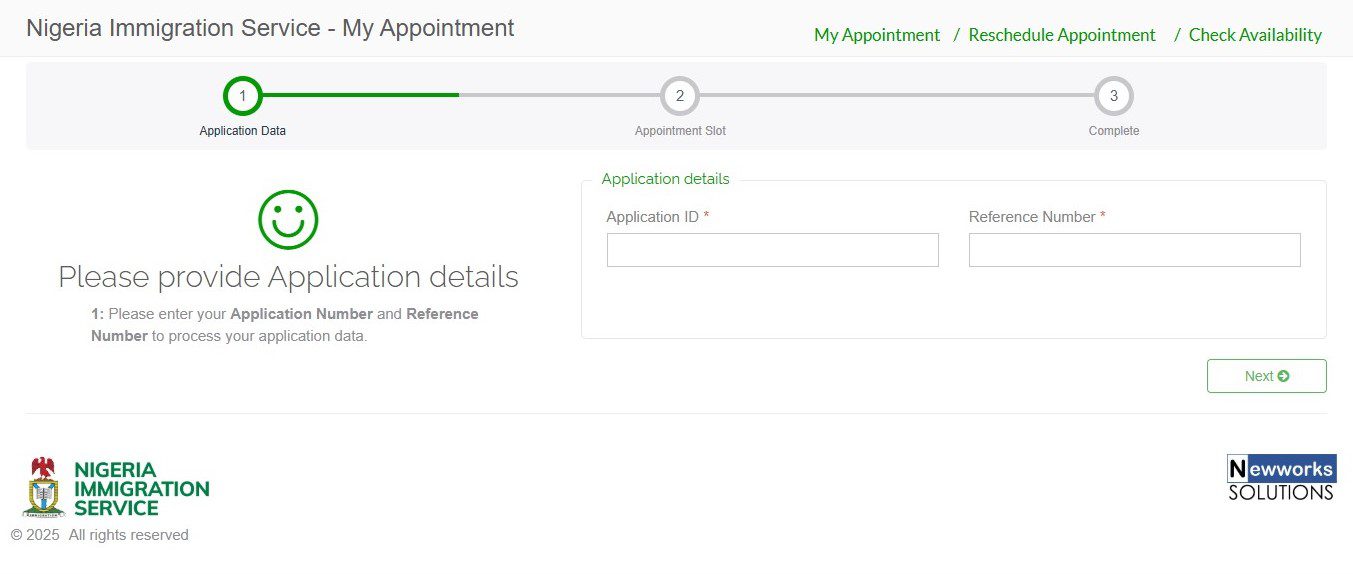
After your passport application and payment, the next stage is to book a physical appointment for biometric capture at your immigration processing office.
- Go to the homepage and click on ‘Book Appointment’
- Provide your application number (ID) and reference number, then click ‘Next’.
- Book your appointment by selecting the state, city, and availability date and time, then click ‘Next’.
- Confirm your details and print out your appointment slip.
Tip: It’s essential to choose a day you are certain of your availability. You will not be attended to outside this date.
In case you missed your appointment or need to make a change before the scheduled day, you can reschedule.
- Go to the homepage and click on ‘Book Appointment’
- Click on ‘Reschedule Appointment’
- Supply necessary details.
Third Stage – Biometric Capturing
On the scheduled day of your biometric capture;
- Be punctual at the immigration processing office.
- Go with 2 copies of your payment receipt, a copy of your application slip, and booking appointment slip.
- Go with all documents you uploaded during the application process (in case the ones you uploaded are queried due to low quality, you then re-upload them at the spot).
- Your online application process will be thoroughly checked and passed for final approval.
- Once approved, you’ll receive an email confirming that your application has been approved. The ‘Approval Status’ will also change from ‘Waiting for Approval’ to ‘Vetted.’
- You will be directed to the biometric studio for thumb printing, face, and signature capture.
Also Read: A step-by-step guide to applying for the contactless Nigerian passport renewal.

Last Stage – Passport Collection
After capturing, you can begin to track your application process.
- Go to the homepage.
- Click on ‘Track Application’ in the right-hand corner and supply your reference and application number.
- It displays a checkbox that allows you to track your application status.
- You’ll receive an email once your passport is produced.
- With the new model in place, the waiting period between biometric capture and passport production is 3 to 6 weeks.
Against diverse perceptions, the Nigerian passport application is now a seamless and self-directing process that doesn’t require an agent’s assistance.
